 k2k audio
 This guide walks you through the Editor’s core logic. It’s not a parameter reference — the goal is to get the mental model right so the Editor stops feeling like a pile of unfamiliar icons and starts feeling like a workflow you can move through.
For deeper background on what the scopes show, see the Editor Reference.
The big picture
K2K is buffer-based. You load audio files into the graph — you cannot feed a live input signal into it. Everything flows from loaded buffers through nodes you wire together. Every node holds a buffer; clicking its Eye sends that buffer to the scopes and the transport.
LoadAudio → Node → Node ↑ ↑ Each node can be viewed (Eye) and tweaked (Gear). The Eye-active node's buffer is what you hear.Two modes share the app:
- Editor — node graph, scopes, parameter panel. (This guide.)
- Player — step sequencer, pads, mixer. See Player Quickstart.
Mode switch: top-right corner of the window.
Editor layout at a glance
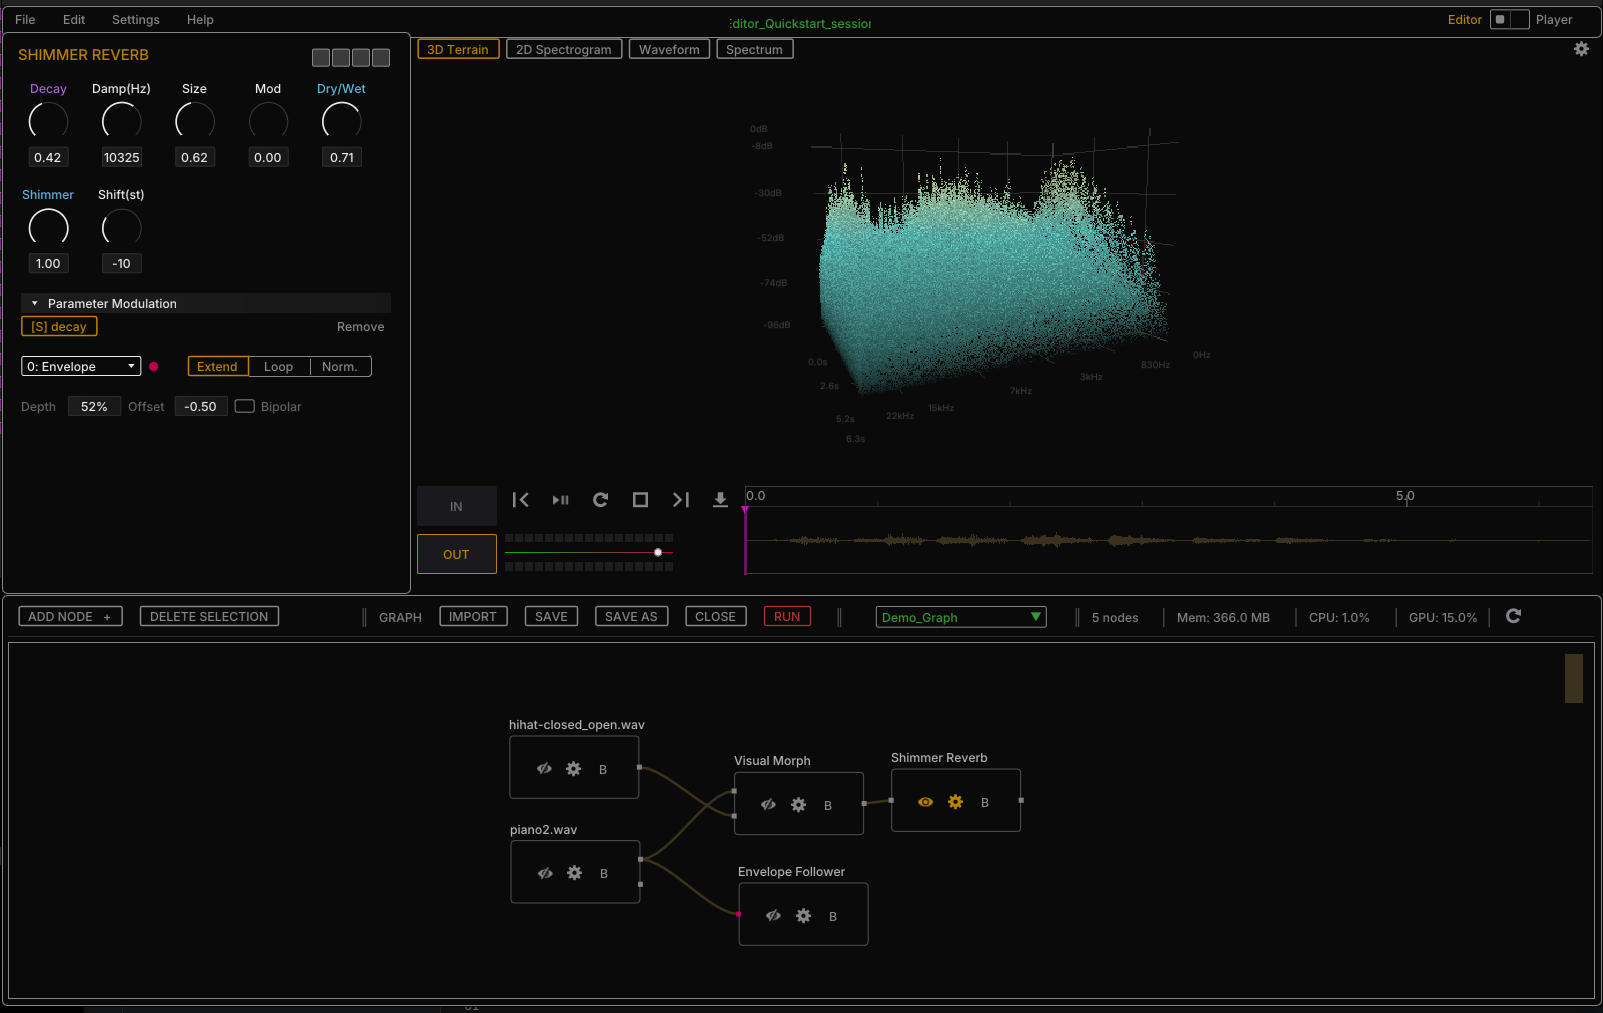
The Editor window is divided into four regions:
- Toolbar (top) — ADD NODE button, global controls, and the Editor / Player mode toggle on the far right.
- MainViewer (top-left, large) — the scopes: 3D terrain, 2D spectrogram, spectrum, waveform.
- Parameter Panel (top-right) — shows one node’s parameters at a time (the one whose Gear is active).
- Playback controller (middle strip) — IN/OUT selector, transport, waveform readout.
- Node Graph Editor (bottom) — the canvas where you build patches.
Two things to internalize right now:
- Only one node’s parameters are visible at a time, in the Parameter Panel. You choose which by clicking that node’s Gear icon.
- Only one node’s output is previewed in the MainViewer at a time. You choose which by clicking that node’s Eye icon.
This is intentional — it lets you tweak the parameters of an upstream node while listening to and watching the processed result of a downstream node.
The four scopes and the dozen color modes that paint them are documented in the Editor Reference. Worth a skim before you go deep.
1. Adding nodes
Two ways to open the node palette
-
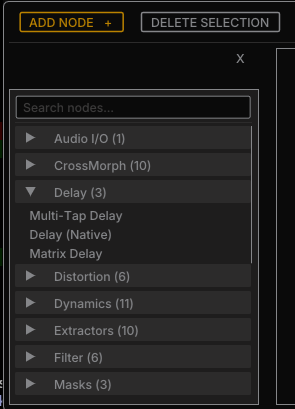
Toolbar: click [ADD NODE +] — palette appears on the left side.
-
Canvas: right-click an empty area of the node graph — palette appears at the cursor as a context menu.
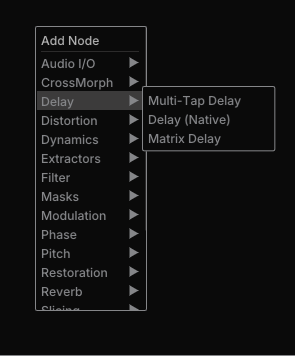
Both palettes behave the same way:
- Scroll vertically to browse categories (the last category is Utilities).
- Click a category to expand it.
- Click a node name to add it to the graph.
New nodes appear near the middle of the canvas.
Shortcut: press A with the canvas focused to toggle the left-side palette.
Moving nodes
L-drag any node by its header to reposition it. If two nodes overlap on creation, just drag one out of the way.
2. Loading an audio file
Add a Load Audio File node from the Audio I/O category.
Every node has icons in its header. Load Audio File has two you need right now:
| Icon | Purpose |
|---|---|
| 👁 Eye | Show this node’s output in the MainViewer |
| ⚙ Gear | Show this node’s parameters in the Parameter Panel |
Most other nodes also have a B icon — bypass. Load Audio File doesn’t need bypass because it has no input.
Load the file
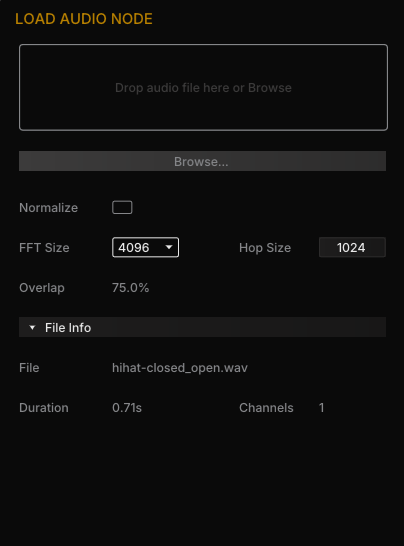
- Click the Gear on the Load Audio File node. The Parameter Panel (top-right) now shows its settings.
- Either drag-and-drop an audio file into the drop zone, or click Browse and pick one (WAV, AIFF, FLAC — not MP3).
- Start with a 3- to 5-second clip — short buffers make the rest of this guide faster to follow.
- Once loaded:
- The node’s output pins change from red (empty) to light gray (data available).
- A File info section appears in the Parameter Panel, showing sample rate, channels, length.
Listen and look
- Click the Eye on the Load Audio File node.
- The MainViewer (top panel) now shows the 3D spectral representation of the audio, and the waveform appears in the playback controller at the bottom.
- Press Play on the left of the waveform to audition.
Switching scopes
- At the top of the MainViewer, switch between scope types (3D terrain, 2D spectrogram, spectrum, waveform).
- The small Gear in the top-right of the MainViewer opens scope-specific settings, including the color mode dropdown.
3. The Eye / Gear pattern
This pattern is the whole editor workflow. Internalize it once and everything else falls into place:
- Eye icon = what am I looking at / listening to in the MainViewer?
- Gear icon = whose parameters am I editing in the Parameter Panel?
- Only one Eye and one Gear are active at a time. The active ones are highlighted in dark orange.
- They are independent: you can have the Gear on an upstream node (say, Load Audio File) while the Eye is on a downstream node (say, a reverb). Tweak the source while hearing the effect.
Every node plays by these rules.
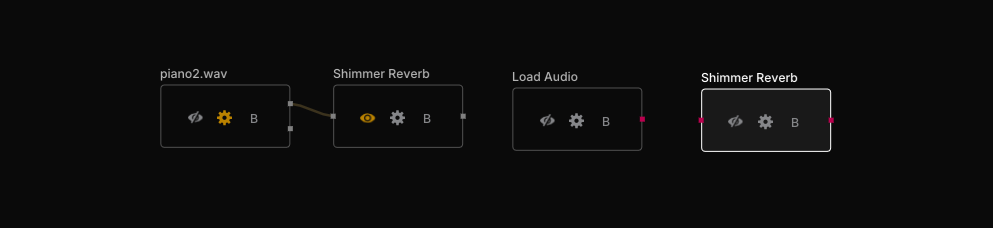
4. Adding a processing node — example: Shimmer Reverb
Now repeat the same logic with a second node.
- Right-click the canvas (or press [ADD NODE +]) to open the palette.
- Scroll to the Reverb category, expand it, select Shimmer Reverb.
- The node appears in the middle of the canvas. Drag it aside if it overlaps the Load Audio File.
Wire it up
- Press and hold on the Load Audio File output pin (right side of the node).
- If it has two output pins, you loaded a stereo file. Pick one channel (L or R).
- Drag the connection to the input pin on the left side of Shimmer Reverb.
If the wiring is valid, both pins change from red to bright gray — data is flowing.
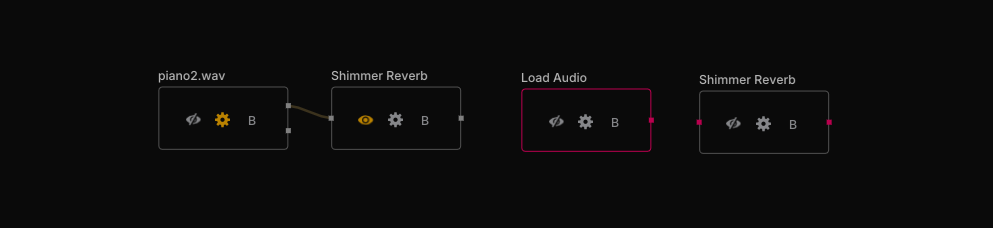
If pins stay red, click Shimmer Reverb’s Eye — this forces it to pull the upstream buffer and render its output. The MainViewer should then show the processed audio.
Play with it
- Click the Gear on Shimmer Reverb to expose its parameters.
- Loop playback from the transport and tweak knobs — you should hear changes in real time.
Caveat: not every node is real-time. Heavy spectral nodes like Visual Morph and the extractor nodes take a couple of seconds to re-process after a parameter change. That’s expected.
5. Parameter modulation
Some parameters can be modulated. Right-click a parameter knob to see if modulation options are offered.
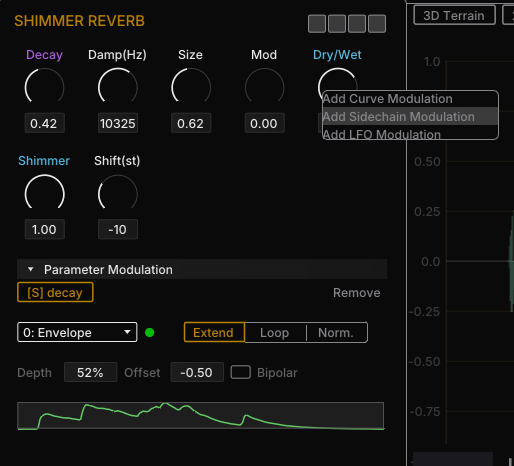
Three modulation sources:
| Source | What it does | Setup |
|---|---|---|
| Custom Curve | Draw a curve by hand | Right-click knob → add modulation → edit curve inline |
| LFO | Cyclical modulation | Right-click knob → add modulation → pick LFO shape/rate |
| Sidechain | Follow another signal’s envelope | Needs prep — see below |
Sidechain setup
Sidechain modulation reads from an envelope slot. You create one by adding an Envelope Follower node (in the Utility category). Route an audio source into it, and the envelope becomes available as a modulation source elsewhere in the graph.
The full picture of modulation sources, slots, and routing lives in Modulation System.
Try it: on Shimmer Reverb, Decay, Dry/Wet, and Shimmer can all be modulated. An LFO on Dry/Wet gives a breathing texture in seconds.
6. Loading the demo graph
A small demo graph is provided so you can see a non-trivial patch and reverse-engineer how nodes interact.
What’s inside:
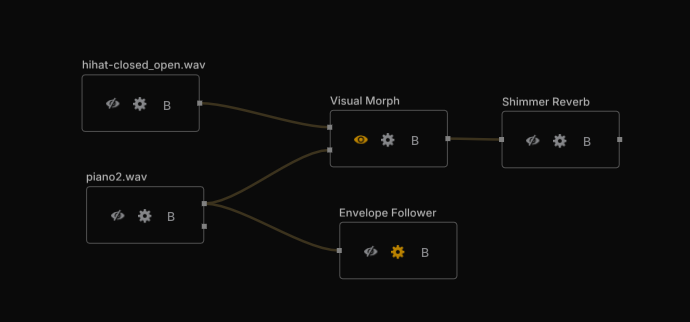
- Two Load Audio File nodes feeding a Visual Morph node (the spectral morph between two sources).
- The morph feeds a Shimmer Reverb. Click that node’s Eye to hear the morphed-and-reverberated buffer.
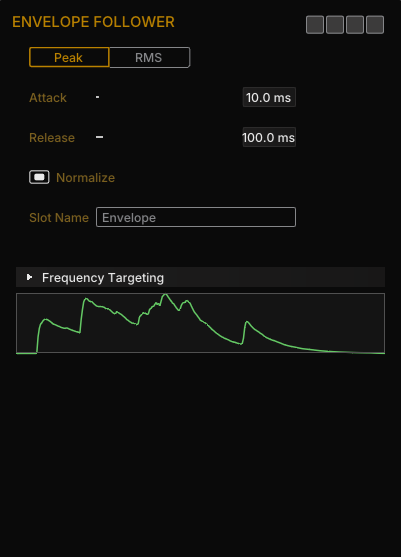
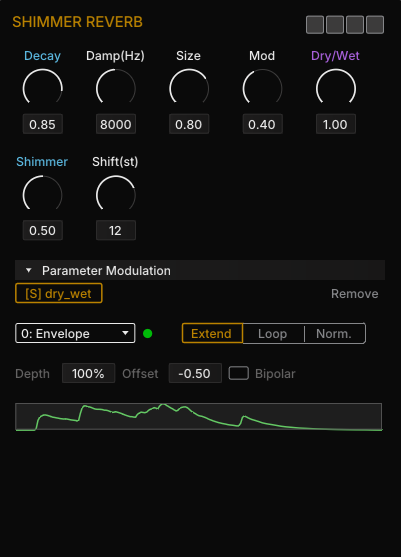
- An Envelope Follower taps one of the sources and sidechains the reverb’s Dry/Wet — so the wet tail breathes with the source’s amplitude.
How to load it
- Drag-and-drop the
.graphfile directly onto the node graph editor canvas. - Load audio files into both Load Audio File nodes (same procedure as §2). Try a sustained tone or pad in one, and a percussive or noisy texture in the other — the morph is most audible between contrasting sources.
- Press [RUN] in the toolbar to execute the entire graph in one pass.
- Click Eye/Gear icons on each node to explore what it’s doing.
What to look at
The Envelope Follower’s settings — attack, release, and the envelope it produces:
The Shimmer Reverb’s Dry/Wet knob with sidechain modulation routed in:
This is the fastest way to feel the Eye/Gear pattern, the Visual Morph latency, and a real sidechain in one sitting.
7. Essential gestures cheat sheet
The minimum to be productive:
| Gesture | Action |
|---|---|
| L-click node header | Select node |
| L-drag node | Move |
| Shift + L-click | Multi-select |
| Alt + L-drag | Duplicate while dragging |
| Delete | Delete selected nodes / links |
| Ctrl + C / V | Copy / paste |
| L-drag output → input | Create connection |
| Ctrl + L-click link | Detach and reconnect |
| R-click empty canvas | Open Add-Node menu |
| M-drag canvas | Pan |
| Scroll on canvas | Zoom |
| A | Toggle left palette |
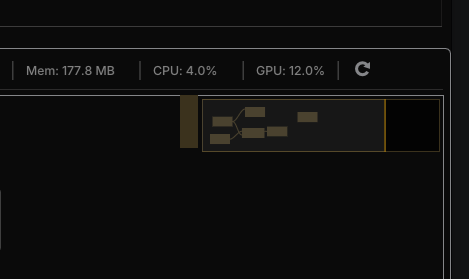
| M | Toggle minimap |
macOS trackpad users (no middle-button emulation)
| Gesture | Action |
|---|---|
| Ctrl + Option + L-drag (horizontal) | Pan canvas |
| Ctrl + Option + Shift + L-drag (vertical) | Zoom canvas |
| Ctrl + Option + double-click | Reset zoom to 1.0 |
Mental model recap
- Buffer-based, not live. Load files, wire nodes, process, listen.
- One Gear = one editable node in the Parameter Panel. Switch by clicking another Gear.
- One Eye = one previewed node in the MainViewer and transport. Switch by clicking another Eye.
- Eye and Gear are independent — tweak A while watching B. Orange highlight = active.
- Red pins = no data, gray pins = data flowing. If a downstream node stays red, click its Eye to force a render.
- Not every node is real-time. Visual Morph, extractors, and other heavy spectral nodes may take a second or two.
- Modulation: right-click a knob. Sidechain needs an Envelope Follower node upstream.
Typical flow
- Add a Load Audio File node → drop in a 3–5 s clip via its Gear panel.
- Click its Eye to preview; press Play in the transport.
- Add a processing node (e.g. Shimmer Reverb). Wire the source’s output to its input.
- Click the new node’s Eye — now you’re hearing the processed signal.
- Click its Gear to tweak. Loop playback while you dial in.
- Right-click a modulatable knob to add an LFO or Custom Curve.
- Keep chaining. Move the Eye downstream as the graph grows; leave the Gear wherever you want to edit next.